Dockerizing is the process of packing, deploying, and running applications using Docker containers. Docker is very popular among the developers. In this post, I am going to show you “Containerize Your .NET 7.0 Web Application With Docker”. for local development.

Before that, I will briefly explain what is docker and .NET

What Is Docker?

Docker is an open source tool that combines your application with all the necessary dependencies and libraries as one portable package (docker image). That package can be shared to any one and run by anyone without much worrying about the operating system.

What Is .NET?

.NET (pronounced as “dot net”; formerly named .NET Core) is a free and open-source, managed software framework for Windows, Linux, and macOS operating systems. It is a platform independent and successor to .NET Framework.

Dockerizing is the process of packing, deploying, and running applications using Docker containers.

Prerequisites

Docker should be pre-installed in your machine. If you don’t have, please install form following link:

  1. Install docker form : https://docs.docker.com/engine/install/

Steps to Containerize .NET Web Application With Docker

.NET 7.0 Web Application can be decorize in following steps.

Step 1 : Create New .NET 7.0 Web Application

You have two options: you can either use an existing .NET 7.0 web application or create a new one.

For demonstration purposes, I will create a small .NET 7.0 web application that accesses the default API endpoint provided by the framework.

I will utilize Visual Studio to create the .NET 7.0 web application, assuming that you are already familiar with the process.

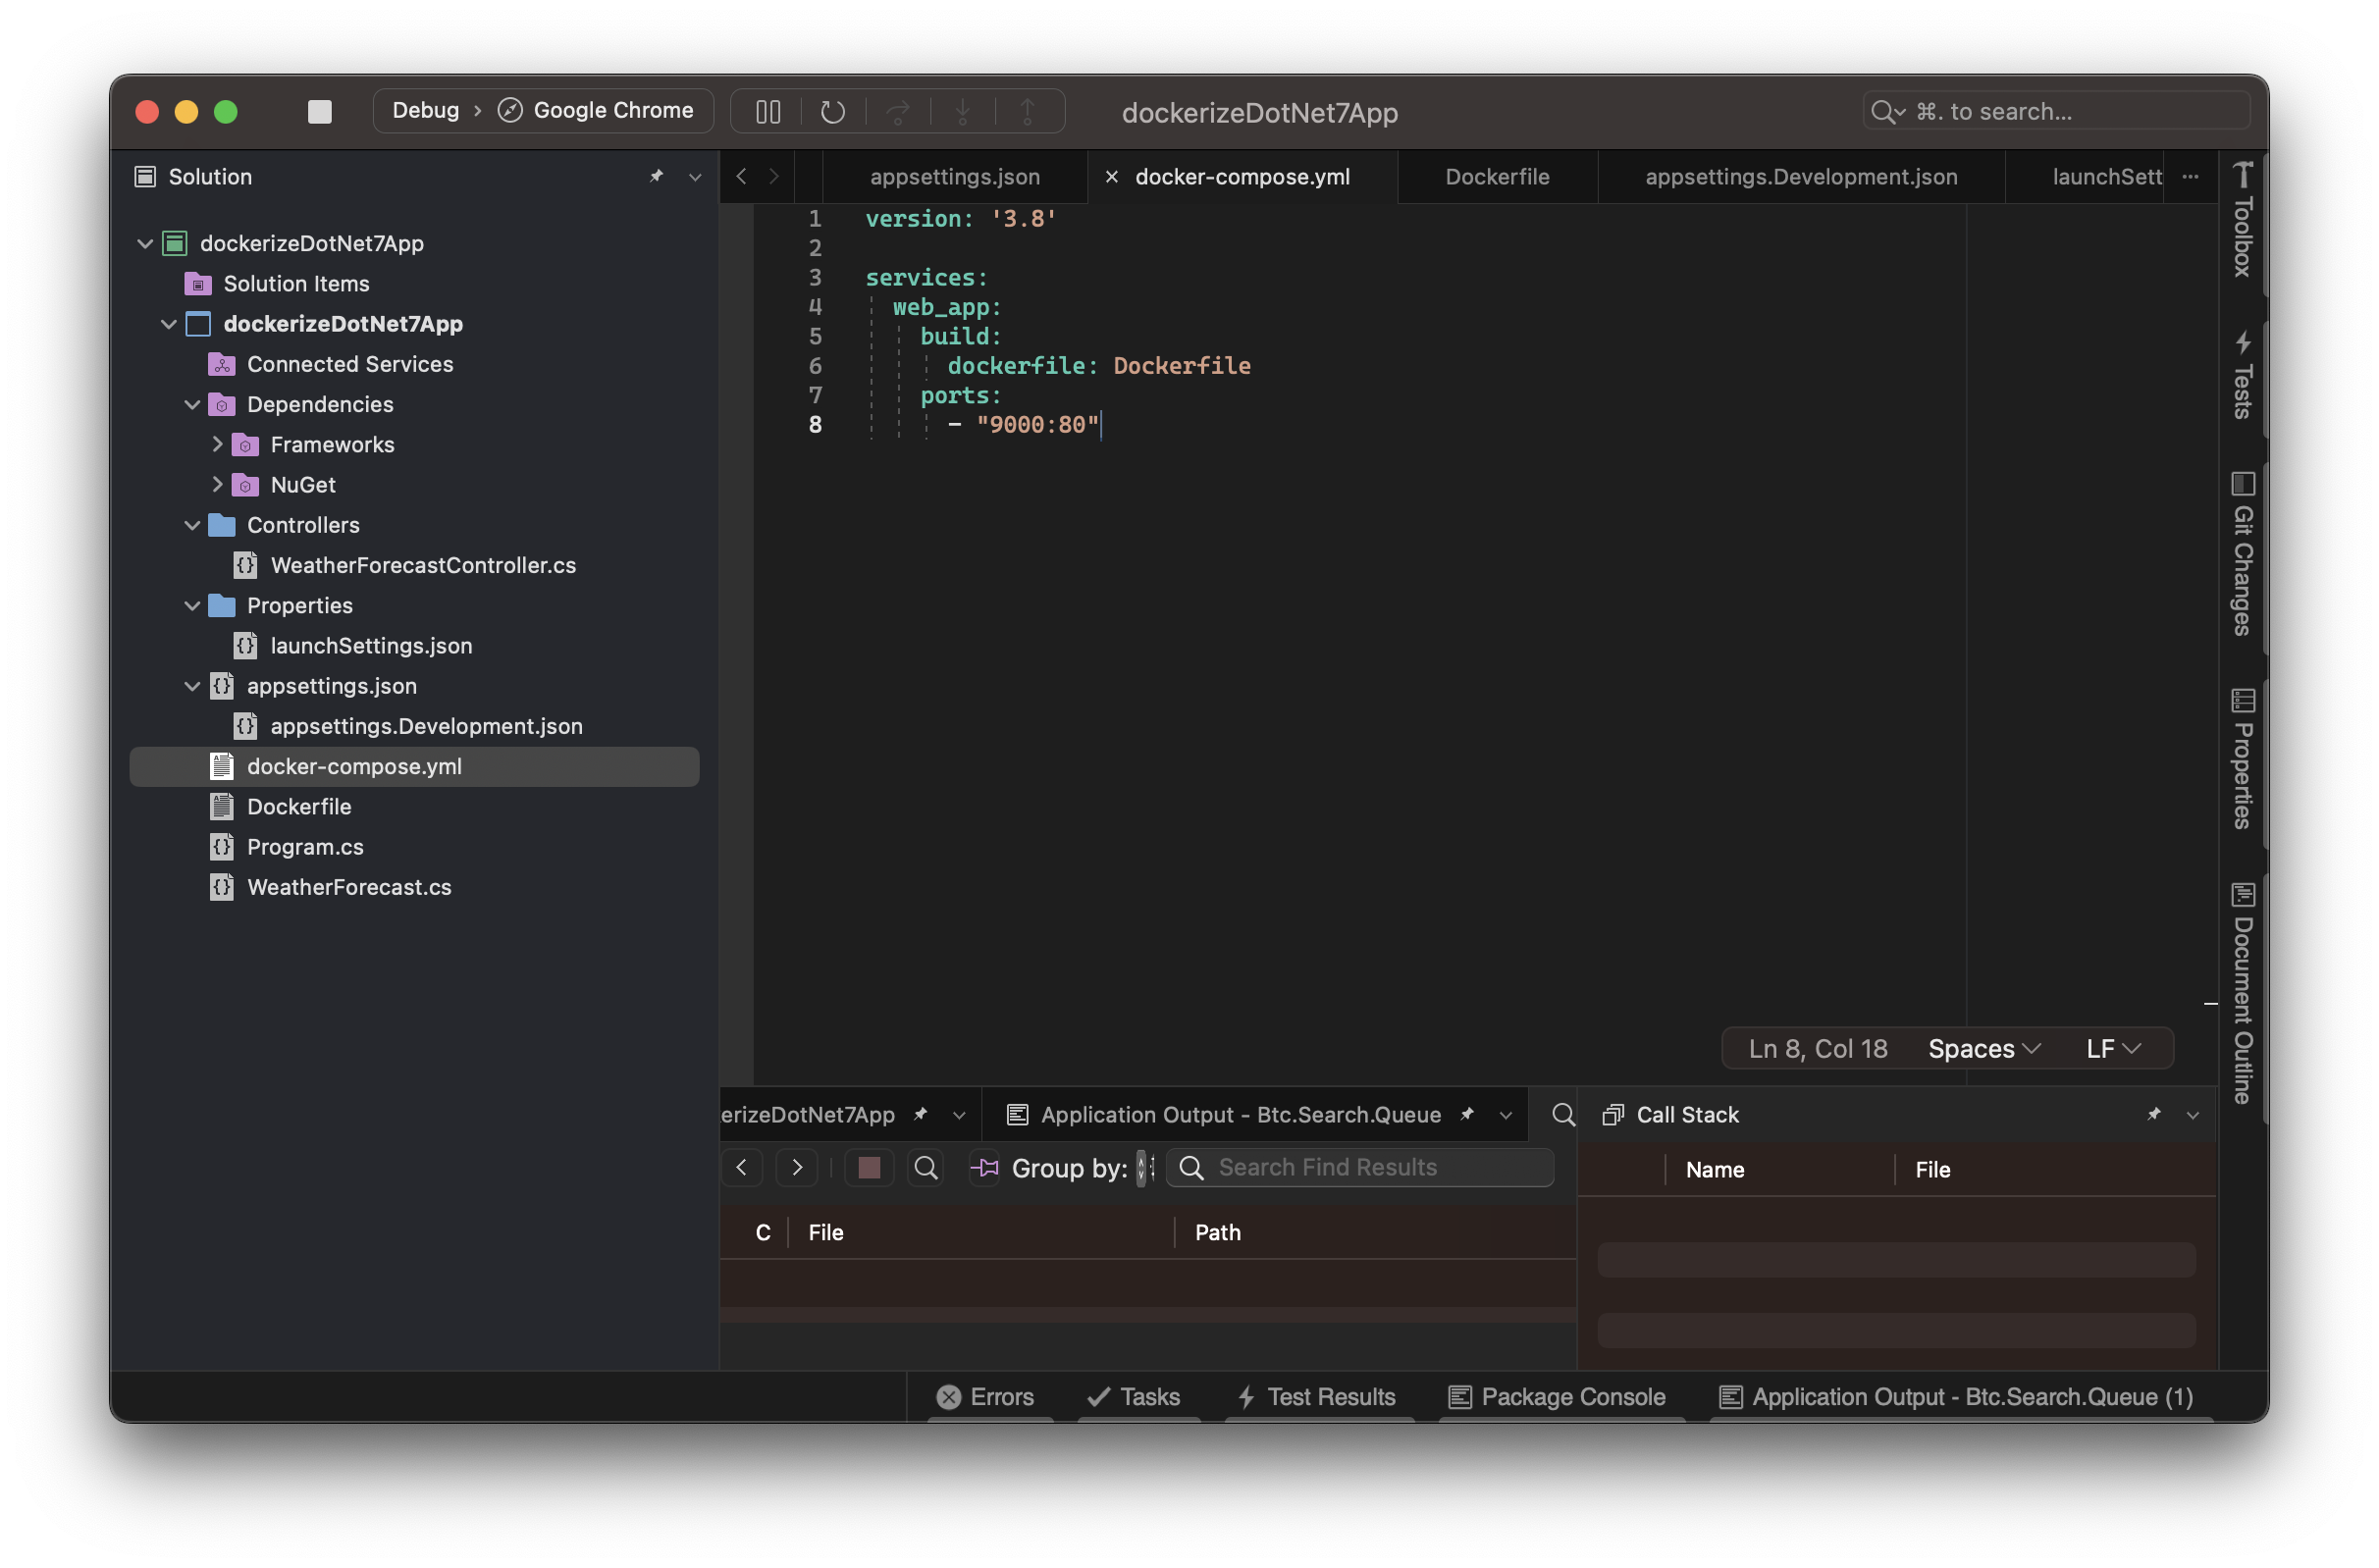
Upon creating the application, it will automatically generate a WeatherForecastController.cs file by default. This file includes the default API to list the Weather Forecast. After containerizing the application, I will proceed to test the Weather Forecast API.

Here is the structure of my Dotnet application.
Containerize Your .NET 7.0 web application With Docker

Step 2 : Create Dockerfile file

Create a Dockerfile inside root of your project. This file should include following instruction.

 1
 2
 3
 4
 5
 6
 7
 8
 9
10
11
12
13
14
15
16
17
18
19
20
21
22
23
24
25
26
27
# Stage 1: Build the application
FROM mcr.microsoft.com/dotnet/sdk:7.0 AS build
WORKDIR /app

# Copy the project file and restore dependencies
COPY ["dockerizeDotNet7App.csproj", "."]
RUN dotnet restore dockerizeDotNet7App.csproj

# Copy the rest of the application code
COPY . .

# Build the application
RUN dotnet build dockerizeDotNet7App.csproj -c Release -o /app/build

# Publish the application
RUN dotnet publish dockerizeDotNet7App.csproj -c Release -o /app/publish

# Stage 2: Create the final image
FROM mcr.microsoft.com/dotnet/aspnet:7.0 AS final
WORKDIR /app
EXPOSE 80

# Copy the published application from the build stage
COPY --from=build /app/publish .

# Set the entry point
ENTRYPOINT ["dotnet", "dockerizeDotNet7App.dll"]

Step 3 - Add a docker-compose.yml file

Add a docker-compose.yml in your project root. Please check in the attached project structure image. This docker-compose.yml is not necessary, but it helps to build abd run the docker image and container easily.

I have used following instruction in the docker-compose.yml file.

1
2
3
4
5
6
7
version: '3.8'
services:
  web_app:
    build:
      dockerfile: Dockerfile
    ports:
      - "9000:80"

Port mapping

Port mapping is very important here step. In Stage 2 of Dockerfile, where I have open a port on the Docker container. You might be thinking port 80 is default or common port and should be open by default, But in docker, it is not. By default, Docker doesn’t allow inbound requests to your container unless you explicitly tell Docker to open a port. In this project I am exposing port 80 internally in side Docker and mapped to port 9000 of host machine form docker-compose.yml file. So that I can run my application in http://localhost:9000/

Step 4 - Build Docker Image

To build docker image, you have to run docker compose build command. This command will take few minutes to pull the dotnet image, install dependencies, copy files, and create app image. May be you can skip this step and directly jump to step 5.

Step 5 - Start the containers

Now, you can run docker compose up command. This command will start project in the container and maps container’s internal port 80 to external port 9000.

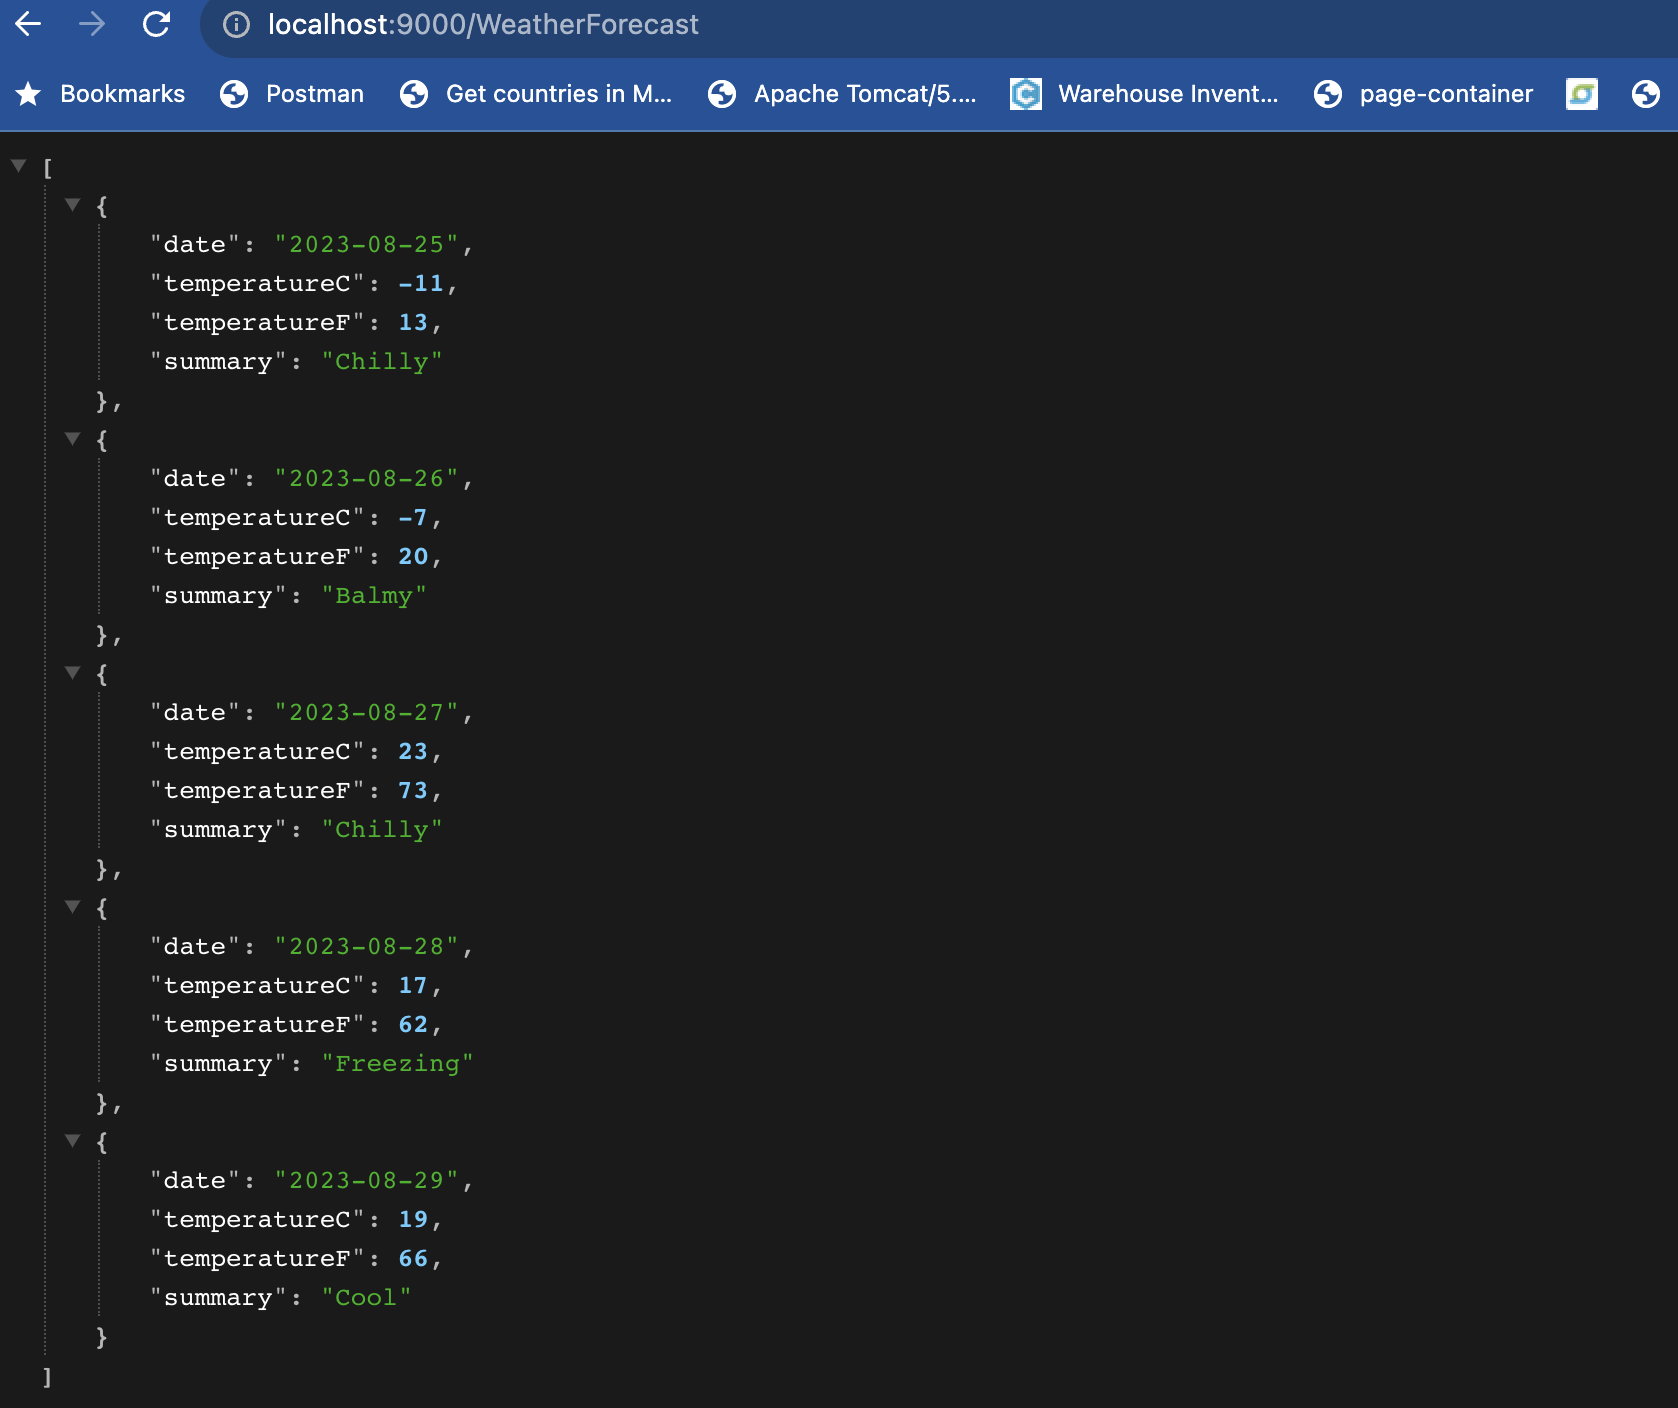
Once docker compose up is successful, you can access your app locally via web browser http://localhost:9000/WeatherForecast Here, WeatherForecast is the default API provided by .NET 7.0.

To stop the containers, press Ctrl+C in the terminal.

Here is the output log for docker compose up

 1
 2
 3
 4
 5
 6
 7
 8
 9
10
11
12
13
14
15
16
17
18
19
20
21
22
23
24
25
26
27
28
29
30
31
32
33
34
35
prakash@ip-192-168-1-2 dockerizeDotNet7App % docker compose up
[+] Building 0.3s (16/16) FINISHED                                                                                                                                                                                              docker:desktop-linux
 => [web_app internal] load build definition from Dockerfile                                                                                                                                                                                    0.0s
 => => transferring dockerfile: 820B                                                                                                                                                                                                            0.0s
 => [web_app internal] load .dockerignore                                                                                                                                                                                                       0.0s
 => => transferring context: 2B                                                                                                                                                                                                                 0.0s
 => [web_app internal] load metadata for mcr.microsoft.com/dotnet/aspnet:7.0                                                                                                                                                                    0.3s
 => [web_app internal] load metadata for mcr.microsoft.com/dotnet/sdk:7.0                                                                                                                                                                       0.2s
 => [web_app build 1/7] FROM mcr.microsoft.com/dotnet/sdk:7.0@sha256:926b9337622ccc594ed051d3559f1c4544686c9fd5f4656f09d1fe37d9a5ace2                                                                                                           0.0s
 => [web_app final 1/3] FROM mcr.microsoft.com/dotnet/aspnet:7.0@sha256:54a3864f1c7dbb232982f61105aa18a59b976382a4e720fe18b4af98fcd663a6                                                                                                        0.0s
 => [web_app internal] load build context                                                                                                                                                                                                       0.0s
 => => transferring context: 5.85kB                                                                                                                                                                                                             0.0s
 => CACHED [web_app final 2/3] WORKDIR /app                                                                                                                                                                                                     0.0s
 => CACHED [web_app build 2/7] WORKDIR /app                                                                                                                                                                                                     0.0s
 => CACHED [web_app build 3/7] COPY [dockerizeDotNet7App.csproj, .]                                                                                                                                                                             0.0s
 => CACHED [web_app build 4/7] RUN dotnet restore dockerizeDotNet7App.csproj                                                                                                                                                                    0.0s
 => CACHED [web_app build 5/7] COPY . .                                                                                                                                                                                                         0.0s
 => CACHED [web_app build 6/7] RUN dotnet build dockerizeDotNet7App.csproj -c Release -o /app/build                                                                                                                                             0.0s
 => CACHED [web_app build 7/7] RUN dotnet publish dockerizeDotNet7App.csproj -c Release -o /app/publish                                                                                                                                         0.0s
 => CACHED [web_app final 3/3] COPY --from=build /app/publish .                                                                                                                                                                                 0.0s
 => [web_app] exporting to image                                                                                                                                                                                                                0.0s
 => => exporting layers                                                                                                                                                                                                                         0.0s
 => => writing image sha256:7910fa8621179b0adbfc024c8207a48c632c250386f85373cfaf381dcd6a97f3                                                                                                                                                    0.0s
 => => naming to docker.io/library/dockerizedotnet7app-web_app                                                                                                                                                                                  0.0s
[+] Running 1/1
 âś” Container dockerizedotnet7app-web_app-1  Created                                                                                                                                                                                             0.0s 
Attaching to dockerizedotnet7app-web_app-1
dockerizedotnet7app-web_app-1  | info: Microsoft.Hosting.Lifetime[14]
dockerizedotnet7app-web_app-1  |       Now listening on: http://[::]:80
dockerizedotnet7app-web_app-1  | info: Microsoft.Hosting.Lifetime[0]
dockerizedotnet7app-web_app-1  |       Application started. Press Ctrl+C to shut down.
dockerizedotnet7app-web_app-1  | info: Microsoft.Hosting.Lifetime[0]
dockerizedotnet7app-web_app-1  |       Hosting environment: Production
dockerizedotnet7app-web_app-1  | info: Microsoft.Hosting.Lifetime[0]
dockerizedotnet7app-web_app-1  |       Content root path: /app

Step 6 - Test The Application

You should be able to access your application locally at port number 9000. Y ou can browse http://localhost:9000/WeatherForecast in your web browser, and you should be able to see below screen.
How to Dockerize a React Application?

Conclusion

Finally, we are done. That’s it!

We have locally created .NET 7.0 Web Application, containerize the app using docker and ran with the help of docker-compose tool. Hope this steps helped you to skill up.